- Establish a Teamviewer VPN Connection from your Renderhost to your Client (or vice versa, it doesn’t really matter). Teamviewer is availiable for free for non-commercial use at http://www.teamviewer.com/ – I recommend setting up a personal user account. That way, you can install the handy “Teamviewer Host” edition on every Rendernode and make them accessible in your own Teamviewer client list, where you can see which Node is currently online. The host edition will start automatically when you boot a rendernode.
Possibly, other VPN Services like Hamachi will work, too.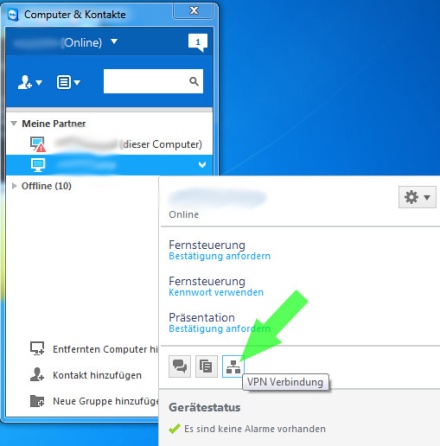
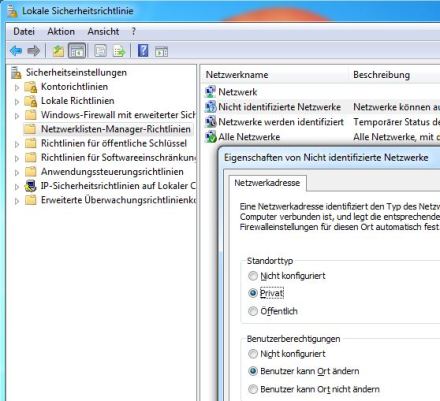
- After successful connection, minimize the Teamviewer VPN Status Window and look into your “Network and Sharing Center” of Windows. There, you should be able to see a new unidentified network. Since these are treated as “public networks” with higher security rules, you won’t be able to establish a Team Render connection yet. To solve this problem, you need to make a small and easy change to both of your PCs: Open the run dialog box (Windows + R) and enter “secpol.msc”. Under “network list manager policies”, open the properties of “unidentified networks” and change the type to “private”:
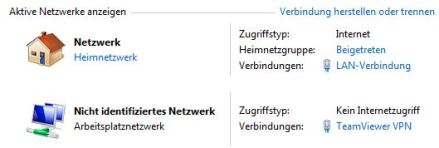
- Do this on both PCs. Remember, that Teamviewer can be used to remotecontrol your client, so your client doesn’t have to be in reach to make this step. If you reopen your Network and Sharing Center afterwards, your VPN Connection should have turned into a private/workplace network type:
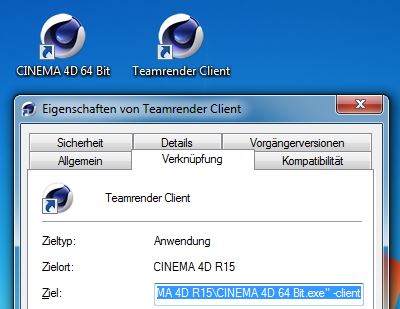
- Start your Cinema 4D Team Render client on your client PC. Remember, that you don’t need to install a seperate Render Client if you already have installed a C4D Version. Just make a Shortcut to C4D and use the commandline parameter -client at the end:
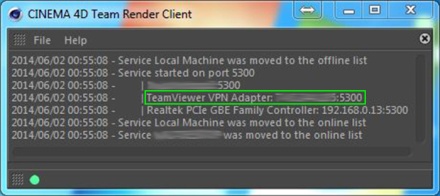
- In your Team Render client, you should be able to see your VPN IP with your Team Render port:

- Copy the IP with the port and add them to your Team Render Machine List on your Render Host in C4D under “Render” –> “Team Render Machines”. If everything went right, you should be asked for the Verification Code which you can look up and specify in the settings of the Team Render client.
- After entering the correct Verification Code, your remote Renderclient should be added to your Team Render Machines List with a green dot, indicating that it is ready for rendering.
- To start Rendering via Team Render to your Picture Manager, use the shortcut Ctrl+Shift+R in C4D on your Host PC.
HAPPY REMOTE RENDERING!
Cinema 4D R15: Team Render via VPN
Disclaimer: Until now (June 2nd 2014), I only tested it with a connection to a single remote Rendernode, located 120km away – both PCs running Windows 7 64 bit. Further tests with Windows / Mac OSx combinations will probably follow. Also, you need to consider and decide for yourself if your scene/texture size and your internet connection makes sense for a remote Team Render scenario. I tested it with a DSL 6000 connection (~5000 kbit/s downspeed and ~150 kbit/s upspeed on the weaker connection side). With a small test-scene and without any large textures, I experienced huge speed improvements even on a single rendered frame.


Works like magic. Thank you very much
LikeLike
I’ve done all by this instruction, but when i try to add client machine to machine list at my host, i get an error with socket timeout 😦
LikeLike
I’m afraid I can’t really help you solve this issue since I didn’t have that problem..
Maybe you have to open the port in your firewall or router…?
LikeLike